Pump seal failure is just about the only source of water leaks we see on
these very reliable washers, and pump replacement is usually pretty quick
and easy. So let's dive right in!
1) Unplug the washer. Remove the 2 Phillips screws that retain the
console. (On some machines, these are hidden under console end caps that
must be pried off. On newer models, they’re on the back of the console).
Rotate the console fwd, then up and back; it will hang back out of the way
if the washer’s away from the wall far enough.
2) Unplug the white lid switch plug and pry up the 2 large clips that
hold the cabinet to the washer back panel.
3) Tilt the entire cabinet forward and it’ll unhook from the retainers
on the base. Lift the cabinet off and set aside (not as heavy as it sounds!)
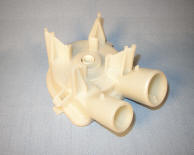
You'll see the pump right in front, very easy to access.
4) Connect your wetvac to the washer's drain hose and run the vac to
empty as much water as possible from the pump and hoses.. (Keep the vac
handy to pickup any remaining water that may spill when you pull the hoses
off the pump).
5) Pry the two retaining clips off the pump and pull it off the motor shaft.
In some cases, especially if it's been leaking for a while, it will be
'frozen' to the shaft. These can sometimes be really tough to remove. In
extreme cases, it's easiest to cut the center out of the pump with a hole saw
or RotoZip® tool, and then pry or cut the remaining hub pieces off.
When that happens, you'll find the motor shaft rusted, but in nearly every
case, it can be resurfaced to accept the new pump. I use a Dremel Moto-Tool®
and sanding drum to grind the rust damage off, but a good file will do the
job too - just a lot slower.
The shaft has to be ground back down so that the new pump slips easily onto
it. If it binds and has to be forced on it will probably develop a leak, so
this is very important.
6) Reinstall the hoses to the pump ports. Put a light coating of
petroleum jelly on the motor shaft (makes this job easier if there's a next
time!) and push the pump
back on, rotating the motor slightly if necessary by reaching back and
turning it by the coupler. Reinstall the pump clips.
7) Before putting it all back together, I like to run the washer with the
cabinet off and double-check that there are no leaks. This can be done by
using a lid switch jumper made for the purpose, or even an alligator clip
jumper carefully inserted into the back of the lid switch plug.
8) To reinstall the cabinet, open the cabinet lid, and, looking down through the lid opening, hook
the cabinet front under the washer base while keeping the cabinet tilted
slightly forward. Rest your foot at the cabinet bottom to hold it in place,
and tip it back down onto the base. Snap the 2 cabinet clips back into
place, and look down the back corners to ensure there are no gaps between
the cabinet and back panel where they meet at the bottom. If one side’s
gapped, it means the rear, bottom retainer on that side isn’t hooked. Pop
the clip on that side, tilt forward slightly, and push the side down into
place. Then reinstall the clip.
9) Plug the lid switch and power plugs back in, rotate the console back
down, reinstall its retaining screws, and pat yourself on the back! You just
saved at least $75.00!
Was this article helpful?
Please click the "donate" button on the left side of
this page to help me keep this information free!
Many Thanks! - Dave
Copyright www.DavesRepair.com
This article may be reprinted and distributed freely only
in its entirety, including this message.