|
How to Fix Whirlpool/Kenmore Direct Drive
(Top-Load) Washer Spin Vibration
Part #285744
(Links to current Ebay search results)
These may may be either brown or white, but I
recommend only Whirlpool genuine OEM pads!
Tools needed: Phillips and straight
screwdrivers, hammer, small piece of 1 X 2 wood, naptha (lighter fluid),
paper towels, long-nosed pliers
A very common call we get on Whirlpool-built direct
drive washers, and one of very few problems they have, is that the machine
vibrates like it's out of balance when spinning, even without any clothes
in the basket. Sometimes it'll 'walk' across the floor if this is allowed
to worsen.
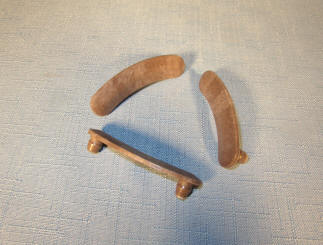
This is almost always caused by worn support pads. The
entire mechanism rests on these three small plastic pads, and when they
wear, even a little bit, the machine will vibrate like crazy in spin, like
its load is badly out of balance. Replacing these pads (Part #285744) will nearly always correct this problem. And they aren't
hard to replace if you're just a little 'handy'. Here's how:
Unplug the washer. Remove the 2 Phillips screws that retain the
console. On some machines, these are hidden under console end caps that
must be pried off. On newer models, they’re on the back of the console.
On some of the latest direct-drives, there are none; you slide a putty knife
between cabinet and console, from the front, to release two clips. Rotate the console fwd, then up and back; it will hang back out of the way
if the washer’s away from the wall far enough.
Unplug the white lid switch plug and pry up the 2 large clips that
hold the cabinet to the washer back panel.
Tilt the entire cabinet forward and it’ll unhook from the retainers
on the base. Lift the cabinet off and set aside (not as heavy as it sounds!)
With the cabinet off, you'll see 3 large horizontal springs, one in
each corner of the support 'tripod', and one smaller, vertical one in the
left-rear that counterbalances the motor's weight.
Unhook all 4 of these springs and insert a small
piece of '1-by' (5/8" or 3/4" thick) board to prop the mechanism
up, to access the pads one at a time. Insert the piece of wood
between pad locations, on a side of the support triangle (a
helper's handy here).
Use a little lighter fluid or rubbing
alcohol to clean the mating
surface of the support plate that these pads ride against before inserting each
new one. Be careful not to scratch the support plate when working under
it; it needs to be smooth and contaminate-free. Try not to touch
the bearing surfaces of the plate with your hands, because even a bit of
skin oil on the plate surface can cause spin vibration issues (I replace
each pad first, then clean the plate and pad at that location).
Knock the old pads out, one at a time, by
lightly tapping on their mounting pins from underneath with a hammer. Put
each new pad in place in its mounting holes, carefully remove the wooden
'shim', then stand up and push down hard on the tub on that corner. You'll
hear - and feel - the pad snap into its mounting holes.
Repeat this process for each of the other
two pads mounted on the support 'tripod' (do the rear, 'fun' one
last, after you have experience replacing the other two), and your
washer will behave a whole lot better in the spin cycle.
Oh, and remember to reach around and pat yourself on the back! You
just saved yourself at least $100.00 (and maybe the price of a new
washer, depending on who you called)!
Was this article helpful?
Please click the "donate" button on the left side of
this page to help me keep this information free!
Many Thanks! - Dave
Copyright www.DavesRepair.com
This article may be reprinted and distributed freely only
in its entirety, including this message.
|