|
How to replace Whirlpool/Kenmore washer
dual-action agitator ratchet ‘dogs’
Part # 285770/80040
(Links to current Ebay search results)
Note: I recommend using only
genuine OEM Whirlpool dogs!
Tools needed: Screwdriver, 3/8" drive ratchet wrench, 7/16"
socket (older models), 3/8" drive to 1/2" adapter (newer
models), long 3/8" drive extension, small amt liquid detergent
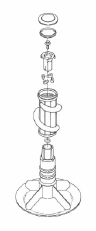
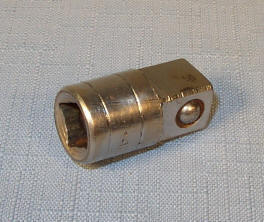
Here's a typical dual-action agitator, the 'older' style, to give
you an idea how they're put together:
1) Pry the agitator cap off by inserting a
screwdriver into the cap's notch
2) Pull the inner cap (if present) off - many
Whirlpool machines use this inner cap, with a handle, to gain access to
the center bolt
3) Remove the bolt in the center of the agitator
(earlier models used a 7/16" hex-head
steel bolt)
|
 |
|
Later models use a square drive plastic nut.
Use a
3/8" x 1/2" ratchet adapter like this, or a 1/2" ratchet
extension to remove it. |
4) On older models, grasp the bottom portion of the
agitator and pull the entire assembly out of the washer.
(Some recent models allow just the top portion's removal to access these
'dogs')
5) Older models - place the agitator on the floor,
and, standing carefully on the bottom portion, pull the top half off.
Turn it over, and the dogs will be accessible for replacement.
6) Newer model dogs can be replaced once just the
ratchet ass'y is removed. There are several versions currently in use,
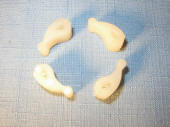
but most can be replaced without removing the bottom agitator half. All
'4-dog' versions use the
285770 (or #80040)
kit, regardless of the cam
ass'y style. (Really old agitators, rarely seen now, used a pair of 2 larger
dogs, which are a different part number)
7) On older versions, be careful to align the two
tabs when inserting the upper ass'y back onto the agitator bottom half.
When these are aligned, they will friction-fit the two halves together,
making it easier to reinstall the ass'y. Handle it only by the bottom
half to prevent pulling the top half off when reinstalling.
8) Lightly lubricate the agitator cap's rubber
gasket using a bit of dishwasher detergent, and push it back into place.
(On the Whirlpools with an inner cap, lube that cap's o-ring too - makes
it easier to snap into place)
9) Reach around and pat yourself on the back! You
just saved about $100.00!
Was this article helpful?
Please click the "donate" button on the left side of
this page to help me keep this information free!
Many Thanks! - Dave
Copyright www.DavesRepair.com
This article may be reprinted and distributed freely only
in its entirety, including this message.
|