|
How to replace
the Kingston timer drive gear (Frigidaire #09956650, no longer available 12-98) in
Kingston model 60 motors, to correct "no rotation".
(In addition to their use in
appliance timers, these little motors were also widely used to animate signs,
operate oven door lock mechanisms, water softeners, lab equipment, etc).
|
 |
|
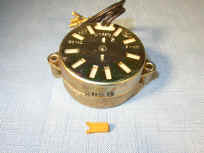
The Model 60's drive
motor and plastic armature gear.
The M60 was a reliable drive motor, used for
many years |
1) If you can hear the motor running but its output shaft isn't
turning, a broken plastic primary drive (armature) gear will almost always be the
cause.
Note: I've been
fabricating these little gears out of brass for a couple of decades now, and they
do much better than the original plastic ones. In fact, I have yet to
see a brass one break! They're listed here.
2) In clothes washers, Removal of the entire timer from the machine is
often not necessary to replace this gear. In most machines (some of the Maytags
are exceptions), by removing the two timer motor mounting screws and the two motor wire quick-disconnects (terminals labeled "TM"), the timer motor can be removed while leaving the timer mounted in the console. Don't be intimidated by all those timer wires; you don't have to deal with them, only the two black motor wires.
3) With the motor on the workbench, make a mark on one side of the case to ensure that its
3 sections are reassembled correctly. A magic marker will work for this, but I like to scratch a line or two down the side with a sharp knife. A scratch won't rub off.
4) To open the motor, I normally use a 1/4" drill bit to cleanly cut the
top of the rivets
off. After it's repaired, foil tape holds the motor together until its 2
mounting screws are reinstalled. The mounting screws then hold them
together securely. Note: Some motors, especially those used in
"traveling" signs, have threaded mounting posts. Those can be glued back
into place with a bit of JB Weld(tm) 2-part epoxy once the foil tape is
applied to tightly hold the two motor shells together.
5) Be careful at this point that the portion with the gear train doesn't
fall open. The gearbox gears do not need to be removed, and if they fall
out, things can get "hairy". We only need to access the rotor section of
the motor for the repair (I always apply a drop of oil on each gear's
shaft, though, while it's apart).
6) Carefully lay the two pieces holding the gear train aside and slip the small rotor gear off the rotor shaft. Be sure you find and scrap the two small "dogs" that broke off this gear. If they're left inside the motor, they will cause problems.
7) Wipe off the rotor shaft, then slip the new gear on (I like to pull
the rotor out and apply a small drop of good-grade oil to the shaft first,
using a needle oiler - but don't lose the tiny plastic
spacer washer underneath) and hold the sections of the motor back together. Make sure your marks align so things go back together correctly.
8) I used to use new mounting posts - they came with the original kits - and went to the trouble of riveting them in place with a center punch and vise-grips. But
over the years I learned this wasn't necessary. Two pieces of heavy
metal foil duct tape work very well.
It can be a little tricky to hold the motor sections together while holding the screws aligned through the posts, then starting them into the timer's screw holes, but after your
first one, it gets a lot easier <grin>. I've never used one, but a hand of a helper might be helpful here.
9) That's about all there is to it! Once the motor's screwed back in place, your timer
(or sign, etc) should advance normally for many years.
Was this article helpful?
Please click the "donate" button on the left side of
this page to help me keep this information free!
Many Thanks! - Dave
Copyright www.DavesRepair.com
This article may be reprinted and distributed freely only
in its entirety, including this message.
|