The DRS News
December 2002
(Merry Christmas! Happy Hanukkah!)
In this issue:
1) Electric & gas range burner tune-up tips
2) Feed your baby, fix your icemaker (huh?)
1) I've been doing a lot of work on electric range surface units
the last few weeks, and thought it might be a good idea to share a few tips to ensure that your
holiday feasts go without a hitch. It probably wouldn't hurt to mention a couple of DIY helps for
gas burners as well, so let's dive right in:
Most of the conventional-burner (coil type) ranges we see these days use plug-in surface units, and that
makes it handy for cleaning. But it's also a weakness, because it introduces one more set
of connections that can fail. You'll have problems most often with the large, 8 in. units. This is
because they're operating at nearly the full rated capacity of their wiring, and everything has to
be right or the sparks will fly (briefly). (If your units are hard-wired and non-removable, or you
have a Ceran smooth-top, you can ignore this section)
A little Preventive Maintenance in this area will go a long way toward never having to call one of
us service guys, and, hey, that's not always a bad thing! I've been a firm believer in PM for a long
time.
Pull the units out, one at a time, and take a look at the 'blade' ends. If they're not clean and shiny
(in many cases your 8" units' blades will be charred black), they'll need to be sanded.
One of the best tools for this is a 'Dremel MotoTool' with a sanding drum or fine stone attached.
Just bend the blades apart slightly and make 'em shine (Guys, this'd be a great time to mention
this tool to the Lovely who fills your stocking), or use sandpaper, even though it's boring (and a lot
slower, Dear, hint, hint…)
If they're in poor condition, you'll also see charred contacts in the receptacle, and these must be
replaced. Trust me on this, if you don't, you'll be redoing this job, and more than just once. (not
to mention the stocking won't be nearly as heavy as it could've been). The most common
replacement these days is Electrolux #
5303935058, a 'universal' kit with 2
different mounting brackets, ceramic wire nuts, and wire 'tails' included.
Here's a picture of one:
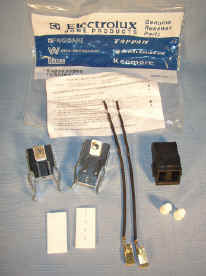
It's best to take one of your originals to your area appliance parts store
(If you can still find one!) to ensure you end up
with the correct receptacle kits. Or contact
me with your model number, and I'll look them up for you. And you may not have to replace all of them. As we've said, it's
usually only the large units that'll have this problem. But take a critical look at the smaller ones,
especially the front one - you know, the one that everyone uses constantly. And even though
there's no power to the surface unit wires when they're turned off, unplug the range first anyway.
(well, um, no, I don't take this advice, but hey, I don't want to lose any of you!)
If you have an old GE range w/removable units, keep in mind that the individual, internal contacts can
be replaced if the ceramic portion of the receptacle is OK.
They're getting harder to find, but are still available as of this
writing. Part numbers: CB105 or GE
#WB5X100. If you're handy, this is definitely the cheapest way to go.
These fit the complete porcelain receptacle #WB17X5051,
although it's easier to just replace the whole block assy. Note:
you'll need 3/16 and 5/16 nut drivers or sockets to replace the contacts.
On gas models, about the only problems you'll see regularly relate to clogged and dirty ports.
Even the newer, sealed burners will need cleaned on occasion. If yours are the type with non-removable caps, just use a pin or small nail to clean the ports to even up the flame on each burner,
and you're all set.
The sealed burners whose caps lift off are about as easy. Just remove the caps and clean both the
underside of the caps and the burners themselves with a wire brush (or a Dremel with a wire
brush wheel – hint, hint). Flames should be even all around the burner, and nearly all blue, with
very little yellow-tipping.
Also, most gas units have a simmer adjustment screw inside the valve shaft. If your 'simmer'
flame is too high, just light the burner, set to simmer, pull the knob and adjust down with a small
screwdriver. We have mostly LP here in the wilds, and this adjustment is the one that's most
commonly missed by installers.
2) Anybody know what babies and icemakers have in common?
Well, OK, maybe not much, but they do share one very handy item. 80% of all the icemaker problems
I see can be corrected using a baby bottle!
Icemakers are set to fill for X seconds regardless of actual water flow, and the volume of water
required is specified in cc's. It just happens that a baby bottle's a really handy icemaker repair
tool, because it is graduated in cc's! And it's compact enough to fit into those cramped freezer
spaces where icemakers reside. Not to mention it's always good for a few questioning looks (techs: Just
for fun, leave the nipple on and carry it in plain view in your tool bag
next to the pantyhose used for checking washer tanks and see what happens!)
But I digress. If your icemaker is producing small cubes, hollow cubes, huge
cubes, or a solid slab of ice, one of the first things you want to check is the fill level. And it's not as difficult as you
might think. (Hey, the hard part's wrenching that bottle out of Pookie's little fingers!) Unplug
the refrig, pull the icemaker - usually one screw underneath, either 2 more or hooks above the
cube mold - and unplug it. Take it to your sink and melt out any cubes with hot water. Then plug
it and the refrig back in, leaving it unattached from the freezer wall.
Manually start a 'harvest cycle' (see below) and hold Pookie's bottle under the fill tube. You'll have to wait a few minutes,
because the water enters near the end of one complete rotation of the cube ejector, which
constitutes a 'harvest cycle'. Regardless your type of icemaker, you're looking for 130-150 cc's,
with most working best around 145cc's, but anywhere in this range should work OK.
Manually starting a 'harvest' cycle:
Two basic designs of domestic, analog icemakers are most common. (Electronic models come &
go from time to time - shudder - but we aren't seeing them in great numbers - yet)
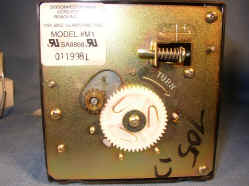
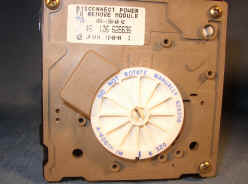
Pop the front cover off yours and check the large gear front & center. If
the front plate is metal, and you see a Phillips screw
in the center of this gear, that's great - you own a 'microswitch'
design. This is one of the most
reliable units ever made! Here's what it looks like with the front cover
off:
To manually start a cycle, either grasp the ejector and rotate
upward (CW fr. front), or use a screwdriver to turn the smaller gear (CCW) if yours has a slot for
this. Once you turn it a short distance, you'll hear a little 'click and the unit will start to run. Make sure the ice-sensing bail has clearance to raise & lower during this test cycle.
If there's no screw, that's OK too, you own a 'modular' unit, and even though
I, um, make more
income from these <grin>, they're still pretty decent (far better
than today's 'offshore' designs). Here's what a
modular looks like with the front cover off:
To start a cycle with this one, don't attempt
to turn the gears manually - you'll break it! You'll need a short piece of insulated solid copper wire, 12-14 gauge.
(Just strip a 4 in. piece out of some 12-2 'Romex' used in house wiring.) Strip the ends back about ¾ in. and bend it into a 'U' shape. This wire is inserted into the holes marked 'T'
and 'H' in the front of the icemaker to bypass the tstat and run a cycle. (don't insert it into any holes except 'T'
& 'H' !) Remove the jumper after a few seconds (or the heater will stay on), and let it run, waiting
for the fill at the end. Again, make sure the ice-sensing bail has clearance to raise & lower during
your test cycle.
Note: I stress this jumper wire needs to be insulated, because you're briefly jumping 120V here.
The usual precautions apply (see the disclaimer
page).
Both icemaker styles have a small screw to adjust water levels. The modular type has very little
adjustment available, though, which means the other components in the water supply have to be
prefect (saddle valve installed properly - not to bottom of pipe, etc - clean fill valve screen, etc.) Just rerun a test cycle after each
adjustment. And be sure to wash & return Pookie's bottle when finished with the test.
Wishing You and Yours the Merriest Christmas ever!
Dave Harnish
drs@sosbbs.com
'For unto us a child is born, unto us a son is given: and the government shall be upon his shoulder: and
his name shall be called Wonderful, Counsellor, The mighty God, The everlasting Father, The Prince of
Peace.
Of the increase of his government and peace there shall be no end, upon the throne of David, and upon
his kingdom, to order it, and to establish it with judgment and with justice from henceforth even for ever.
The zeal of the LORD of hosts will perform this.'
Isaiah 9:6, 7 Copyright
www.DavesRepair.com
All Rights Reserved
This information may be reprinted and distributed freely, but
only in its entirety, including this message.
|