The DRSNews
April 2008
Happy Spring to you!
Published by 'double opt-in' subscription only,
by Dave's Repair Service, (c)2008 All Rights Reserved
WHO ELSE WOULD LIKE THIS NEWSLETTER?
If you enjoy this issue, you're welcome to forward its link
to any friends or associates who might find it useful.
(There's an unsubscribe link in every issue if they decide
it's not their 'thing') Thanks!
***************************************
In this issue:
1) Appliance Installation Quick-Tips, Part 1: Washers & Dryers
2) Subscribers-only 'Two or More Ship Free' sale still going strong!
1) We
talked about dishwasher installation last time, and it got me thinking
that it might be a good idea to take a quick run-through of some installation
details of other appliances. I don’t believe we’ve ever covered the
subject before, and there are just a few tips that can
make things a lot easier.
I’ll
start with washers and dryers this time, and we’ll get into refrigerator
and range installs in the next issue.
Washers
Leveling
Important, but not nearly as critical as
'solidity' to the floor
A concrete floor is best wherever possible
If your machine has foot locknuts, be sure to tighten them
Water Pressure
20-120 psi required (water pressure actually
opens and closes the fill valves)
Drain recommendations
36" min height from floor
5-6' max height recommended with most brands
Air gap (normal standpipe provides this) to prevent siphoning (if drain
is lower than top of console on top loaders, water may drain out during
wash or rinse)
Fill hoses
Fittings are the same size as garden hose
Tighten with pliers, and always use new hose washers whenever
hoses are disconnected. Trust me on this! It's cheap insurance against
leaks.
Always use a dab of silicone-based grease on
metal faucet threads before connecting fill hoses - this will keep them
from rusting and save you a lot of hassle later, when you need to remove
the hoses. (Skip this step, and you may have to hacksaw them off
later!) The same type of grease I use on Whirlpool-built washer brakes
(also used as auto disc brake anti-squeal grease) works great. Petroleum
greases are hard on the rubber hose washers in the hose fittings, and
probably shouldn’t be used.
BTW, I recommend turning off supply faucets when a washer's not in
use. Very few of us actually DO this - only those of us who have seen
what happens when a fill hose bursts with no one at home. And that's
when they always seem to fail!
Dryers
Wiring Requirements
Full-sized electric dryers in use today commonly
draw 22-24 amps at 220-240 volts AC, so a 30-amp supply circuit is
required. That means a 2-pole 30A circuit breaker and 10 gauge copper
wire. Called 10-3WG, this actually contains 4 wires: a 3-wire bundle
with a 4th conductor added as a ground (WG:’with ground’).
Electrical codes call for some sort of
disconnect at the dryer, either a plug and receptacle or a ‘safety
switch’. A disconnect is normally not required if the machine is
installed within 30 feet of the breaker box with no partition wall
between them, but I definitely recommend a plug and receptacle even if
the dryer’s next to the breaker box. Makes life easier all around.
Codes now require a '4-prong' receptacle and
pigtail in new installations.
Gas dryers normally run on ‘standard’ 120 volts AC, and can be plugged
into any 15A or 20A receptacle.
Mis-wired 240V on terminal blocks
Dryer wiring is color-coded, with the red and black ‘hot’ legs of the
220V always connected to the two outer connectors of the main terminal
block on the back of the dryer.
The white neutral lead attaches to the center connector, and the ground,
often a bare wire, connects to the cabinet.
Venting
You
may already know this, but flexible white plastic dryer vent duct isn’t
allowed any more, and most dryer manufacturers won’t honor your warranty
if you use it. And your insurance company may give you real problems
should you ever have a fire related to the dryer vent if this stuff’s
used.
The
white plastic duct really gets brittle as it ages. Cracks and air leaks
are common. And it will fill with water when it's run through a
cold crawlspace or cellar (If this describes yours, at least poke a few
small drain holes in the bottom of the duct until you get a chance to
replace it). I've seen so many problems with it over the years, I've
become a true believer in rigid 4 inch aluminum pipe. Better airflow
means a more efficient and safer dryer.
I’ve
run about 16 feet of smooth-wall aluminum here at our house for 30
years now, and have had to clean it only twice! I check it every year,
but it stays beautifully clean. One of those things that’s worth doing
right, because then you can forget about it for a long time.
Also,
when running solid 4-inch aluminum duct, don’t fasten the sections
together with sheet metal screws or duct tape. The screw points sticking
into the inside of the duct will grab and hold lint, and ordinary duct
tape will dry out and let go pretty quickly from the heat.
I’ve
gotten really good results assembling dryer ducts 2 inch wide foil tape
made for the purpose. Lasts a good long time, and you end up with a nice
smooth interior wall. It’s used in the heating and air conditioning
industry, so you can find it at most any HVAC/plumbing supply store.
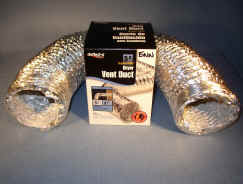
If you have no choice
but flexible duct, consider using a good quality aluminum product like 'Supurr-Flex'â
from Deflecto Corp. This duct is nearly as flexible as the old
plastic, but is constructed of 5 layers of aluminum foil, and has been
an excellent alternative to flex plastic, which is now illegal in
most states. It looks like this:
Whether you're installing your dryer or just moving it to clean behind
it, you'll want to pay close attention to what happens to the flexible
duct ‘tail’ behind it when you push the machine back into place. The
most common result of a kink back there is a burnt-out heating element
or safety thermal limiter, but it can get much worse than that. The flex
aluminum is also less prone to kinking than previous materials.
If your dryer is on a slippery floor and prone
to 'walking' back towards the wall and smashing the duct, a short piece
of 2 X 6 laid on the floor behind the dryer will keep it where it
belongs and breathing easy.
2) A
whole bunch of you have taken advantage of me ;-) with the 'Two or More
Ship Free' sale, and again this month shipping and handling are no
charge for any two or more online products, to any US address. But
only for DRSNews subscribers. Regrettably, this has to be limited
to US subscribers, as international shipping rates have gotten pretty
crazy.
Here's the current list
of parts and tools included:
Sale Parts . If you don't see the one you need there, and you're a
subscriber, just
ask me .
One of the incredible rewards I get from writing this newsletter is the
encouragement you've been to me over the years. I want you to know
I appreciate you, and this is just one small token 'thank you' that I'm
pleased to be able to do for you.
Please feel free to send me any other ideas you might have for
subscriber 'perks' I can add for you, and I'll do my best to make them
happen. And I'm always looking for suggestions for future article topics
and/or manuals, so don't hesitate to send me your ideas.
Swing by and check out my new Appliance Terms Glossary Project if you
haven't yet - it's still a work in progress, with the downloadable pdf
version almost ready. Here's what I have online so far:
Glossary
Thanks
again for allowing me into your inbox! I’ve said it before, but it’s
absolutely true: your trust and friendship are my most treasured assets!
May God richly bless you and yours in 2008,
Dave Harnish
Dave's Repair Service
New Albany, PA
drs@sosbbs.com
Nehemiah 9:6
Copyright
www.DavesRepair.com All Rights Reserved
This information may be reprinted and distributed freely, but
only in its entirety, including this message
|