|
Gas Oven 'Glowbar'
Igniters
How they work, how to replace them
Most gas oven systems today are ‘electronic
ignition’, and use a ‘glowbar’ type ignitor electrically in series with
an oven valve.
(Update 2010: most of the newer ovens are using a spark ignition system,
which has been [cough] less than reliable. That system is completely
different, and uses a round, white ceramic 'spark plug' instead of one
of these glowbar ignitors)
Electrical current passing through the ignitor operates a small heater
that ‘warps’ an internal piece of bimetal to open the gas valve. As long
as the burner flame continues to heat the ignitor, its electrical
resistance remains low enough to keep the valve turned on. If, for any
reason, the flame is extinguished, the igniter's resistance increases
and the valve turns off the gas to the burner.
While the valves are very reliable, the igniters have become the most
common parts failure on these systems. Which is to be expected, I guess;
they’re doing their job in a gas flame!
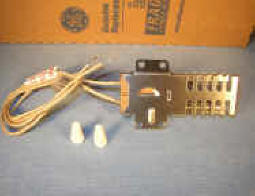
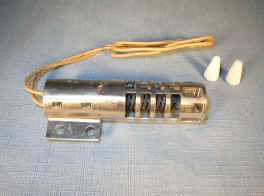
Igniters come in two basic types, ‘flat’ and ‘round’, seen below, and
they can’t be interchanged.
Each type operates at a particular amperage level,
and is matched to the type gas valve it operates. The stainless steel
‘cages’ that protect them usually correspond to their actual shape,
which helps you figure out which one yours uses. And to make it even
easier, there’s pretty much only One round one that fits them all. Flat
ones vary only in the length of the ceramic block to which they’re
mounted. Electrically they’re nearly all the same.
While it’s possible to diagnose one of these systems using an ammeter,
it usually isn’t necessary. Since I try to keep life simple, and since
these igniters have really dropped in price the last few years, it’s
pretty easy to figure out what’s up with your cold oven.
If your oven doesn’t light, but you see the ignitor glowing, it will
most likely be glowing a very dull red and not drawing enough current to
operate the valve. Or, in some cases, it will operate the valve very
slightly and you’ll smell some gas odor. Neither case is desirable or
acceptable!
Note: The bake ignitor is normally hidden under
the oven floor, which is easily pulled up and removed. There's usually a
steel 'flame spreader' on top of the burner, which is also removed to
access the bake ignitor. In ovens with an exposed broil ignitor (up on
the oven ceiling), it's possible to confuse the two and replace the
wrong one.
Watch a clock or stopwatch. If it takes more than 2 minutes to light,
you’ll want to replace the ignitor; it’s the culprit in 90% of these.
And this is the best way for you to diagnose your ignition system! In
most cases, that’s all there is to it. You don’t even have to worry
about wire polarity on the new ignitor – they can be wired either way.
Just be sure it’s wired like the old one, and not connected to 120V
directly, or it will burn out. Ignitor and valve must be in series with
each other, or you’ll burn out one or both, fast!
If you’ve replaced the ignitor and it glows but the oven still doesn’t
light, it’s time for a new valve. They’re pricier, but I usually
recommend doing this once in a range’s life if necessary. Still much
cheaper than a new range.
If there’s no ‘glow’ at all, take a close look at the ignitor, and
you’ll often see a crack, or it may even be obvious that it’s broken
apart. You can use an ohmmeter to test for continuity if no cracks are
visible.
Just be sure to power the range down. In some models, one side of the
oven valve is always ‘hot’ with respect to ground, like some electric
range bake element terminals.
New igniters ship with two ceramic wire nuts, and you simply connect the
new part’s wires to the originals, using the original plug if yours has
one. There are no polarity concerns; the two wires connect either way.
A bit of hi-temp. grease on the mounting screws will be a big help if
you have to repeat this job in the future. These screws are subject to
very high heating, and can ‘freeze’ into their threads so tightly you’d
like to blast to get them out sometimes!
Was this article helpful?
Please click the "donate" button on the left side of
this page to help me keep this information free!
Many Thanks! - Dave
Copyright www.DavesRepair.com
This article may be reprinted and distributed freely only
in its entirety, including this message.
PS: It's a good idea to
check that your oven is working properly before preparing your
Thanksgiving turkey. If oven temperature is off a few degrees it could
significantly affect the cook time of your turkey. It’s important to
know
how long for a 17 - 18 lb turkey to cook for the Thanksgiving
holiday, but if your oven temperature is off it could ruin your dinner.
|