|
How to Replace Your
Whirlpool,
Kenmore, Roper, or Kitchenaid
Electric Dryer's Heating Element
Here's a common job that many folks are
afraid of, but it's really quite simple. The hard part is 'proving' that
the element is the problem, and that it's not the electrical supply,
thermal fuse, thermostat, etc. Most folks suspect the element immediately,
but about 50% of the time, it's another failed component and
the element's fine.
(For some help with that, and before buying an element you might not
need, please see my article entitled 'The
No-Heat Dryer').
Note: Always check airflow out
the vent before firing up your dryer with its new element. A partially
clogged vent can burn out an element - even a brand new one - fast! Just
run the dryer on the 'no-heat' or 'fluff' setting, then go outside and
check for a good strong flow of air from the vent hood. If there's any
doubt, Whirlpool makes a cool little
airflow test tool for their
dryers that will tell you for sure, from inside.
There are basically 3 styles of heating
elements in use for these
dryers.
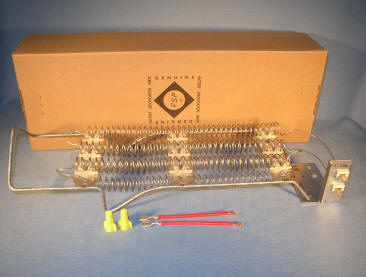
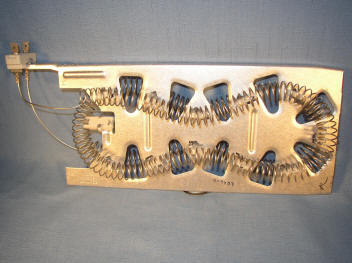
1) Most common is the 'long' one, part
number
4391960, accessed
from the back of the dryer, and which looks like this:
To replace this one, power down and pull the
dryer out
and remove the back cover. You'll see a long, vertical 'can' on the right
side, with the
element coil inside. To remove this can, simply pull the
element wires (can be hard to remove; I use a long-nosed pliers), the limit thermostat wires just above them, and the thermal
fuse wires if equipped (this is a little device mounted high on the side
of the can, with two wires attached). One 5/16" hex screw at the top
and a little strap holds the can in place. Remove this screw (You can look
through the small hole that lines up with it, originally to poke a long
screwdriver through), tip the can rearward, and lift it off its two bottom
hooks. Once the can's out, one screw holds the element inside. Remove it,
and the old element coil will slide out. Slide the new one in, reverse
this process, and you're done!
2) The 'short' one, number
279838,
is also accessed from the back, but is easier to change:
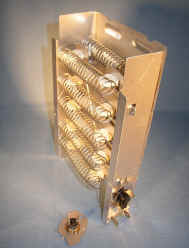
(note: this element doesn't ship with the
thermal
cutout and safety tstat shown in the above photo)
The replacement procedure for this one's very similar
to the 'long' one, but even easier. With the dryer's back cover off (The
dryer's power IS off, right?), leave the long 'can' in place and remove
two screws, one on each side of the element, and the element ass'y slips
off the bottom of the can. Move the high limit t'stat from the old one to
the new, bolt the new element onto the can, reattach the wires, and you're
done!
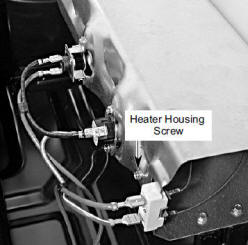
3) And the '27 inch' element, number
3387747,
which fits 27 inch wide cabinet models and is replaced from the front
of the dryer:
Of the three, this one's the easiest to replace,
because you don't even have to move the dryer! After powering the
dryer down, the bottom panel is removed by releasing its top clips with a
putty knife, and set aside. Two wires are removed from the element, and
the screw removed that holds the element in its 'can' (see picture below). The old coil slides
out, and the new one slides in, screw reinstalled, wires pushed back onto
the terminals, and you're done! (This one can really stick in its
'can'. Wiggling it from side to side as you pull helps 'persuade' it to
slide out of there)
I currently have a very inexpensive 'basic
service manual' available for immediate download that covers this and
most every other repair on the 27 inch machines.
Two Important Tips:
1) As stated above, right after replacing a dryer element, always run the dryer on 'air
fluff' / 'no heat', and go outside to verify there's plenty of air coming
out your vent system. If the vent's clogged, that new element can burn out
very quickly. (While you're out there, if there's a screen of ANY size
over the vent, remove it - it WILL clog! See my
Dryer
vent screens article)
2) If there's plenty of airflow, run the dryer empty on high heat for 10
minutes or so before adding laundry. This allows any oil residue to burn
off the new element and prevents any 'smoky' odor from getting into your
laundry.
I hope this has been of
help to you in
replacing your dryer element. Wasn't that easy?! Many common appliance
repairs like this really aren't that tough.
If you should encounter any problems, or
have any questions about any of this, please don't hesitate to contact
me.
Was this article helpful?
Please click the "donate" button on the left side of
this page to help me keep this information free!
Many Thanks! - Dave
Copyright www.DavesRepair.com
This article may be reprinted and distributed freely only
in its entirety, including this message.
|