|
The DRSNews
January/February 2008
A Very Happy 2008 to you!
(Once again I've fallen way behind, and have had to
combine
the Jan & Feb issues of the newsletter. My sincere apologies!)
Published by Dave's Repair Service
(c)2008 All Rights Reserved
***************************************
In this issue:
Repairing the Whirlpool/Kenmore washer gearcase, Part 2
(longer than usual, but I wanted to get this to you in one
issue)
Two issues ago, we talked about removing a Whirlpool-built 'direct
drive' washer gearcase (transmission) from a washer for repair. While
this isn't a really common failure, I am seeing it more often these
days.
That said, I still feel that these machines are the best washers for the
money these days.
This issue I'll run through a few tips on taking it apart and replacing
the
'neutral drain kit' #388253 which includes the only internal parts (the
trip
lever spring and spin pawl - gotta love plastic!) I'm seeing fail on any
kind
of regular basis.
First of all, don't let this job scare you - it's really not hard at
all. It can
get a little messy if you're not careful, because it's easy to drop one
of
these with the cover off and dump the gearcase oil all over the floor
(don't ask me how I've learned that!) But you'll only do that once...
<grin>
Tools needed:
5/16'' socket wrench
external snap ring pliers
scraper or 1-edge razor blade
5/32'' Allen wrench
Degreasing solvent and rags
small block of wood (if clamping in bench vise)
Parts & materials (Whirlpool part #'s):
388253
neutral drain kit
350572 gearcase oil
(or 15 oz of most any high grade 80W-90 gear oil, sold at auto parts
stores)
285352 input shaft seal kit
285753A coupler kit
Before we get started, a couple of notes:
Replacing the oil in these units isn't essential when doing
this job,
but it's a really
good idea, as is replacing your car's oil filter with an oil
change.
Fine metal filings and dirt can accumulate inside any gearbox, and even
though
there's much less accumulated dirt in a washer gearcase than in your
car's engine,
cleaning it and adding new oil will help it last as long as possible.
I never disassemble one that's been in service very long without
replacing its
oil. It's a good practice, and like the oil in your car, when you
compare the
oil coming out with that going in, you'll know it's a smart move.
The factory oil is Whirlpool part
#350572. It's
pricey though, and 15 oz
of any good grade of gear oil works fine. I buy a gallon at a time at
Auto Zone, but
you can also buy it in quarts many places.
I replace the input shaft seal in these whenever I have one apart,
because
that's a pretty common failure and it's easier to do while the gearcase
is on the
bench. An easy seal to replace (part #285352) and not at all expensive,
this
falls under the 'preventive maintenance' heading.
"A life spent making mistakes is not only more honorable,
but more useful than a life spent doing nothing." - George
Bernard Shaw
|
If you've been enduring my rambling for any length of
time, you know that's
a 'soapbox' issue for me <grin>. A little PM has saved me a lot of time
and
aggravation over the years, and I've become a firm believer in it.
You should also plan on replacing the drive coupler - at least the
section mounted
to the input shaft - whenever it's been removed. Reinstalling a used one
isn't
feasible because it won't grip the shaft tightly enough the second time
it's pressed
on, and will fail pretty quickly. The coupler half that mounts to the
motor can be
left in place if it's still tightly gripping the motor shaft, but most
of them I see
aren't, so plan on replacing the
drive coupler #285753A (
instructions ).
The only exception to this *might* be the newest version with the steel
hubs, but I haven't been using those yet. 'Tried one or two so far, but
until
they get the dimensions figured out, I can't recommend them. The current
version is fitting too tightly. But Whirlpool will get it right; they
stay with a
problem until it's resolved. (Note: They have corrected this, and the
new ones
are doing well)
Clamp the gearcase assy in a bench vise by bolting the motor plate back
on and using a small block of wood to help hold it level (I've made a
couple
of handy jigs out of plywood and 1/2" running thread, but I do a lot of
these).
Then remove
the eight 5/16'' hex-head screws holding the cover on. Use a
putty knife to
break
the cover free.
I usually level the gearcase in the vise at this
point, just to make sure the
oil stays where it should when you're putting it all back together,
keeping it
off the lid sealing surface.
There's no gasket used, but just Loc-Tite (tm) sealer between the two, and
the
covers can really stick. I use Corning blue silicone*
to re-seal the cover back on.
The Loc-Tite's just too darned expensive.
Just
thoroughly scrape and clean
the mating surfaces before sealing. Acetone
or
PVC pipe cleaner work pretty
well for cleaning.
*Ordinary silicone seal WILL NOT WORK, but will leak; must be the blue
stuff.
Once the cover's off, remove the plastic spin gear's large snap
ring and flat
washer, and
lift the gear off. NOTE: Do NOT lift the assy by
the shaft once
this snap ring's
off, or the shaft and gear assy will pull out of the gearcase
casting.
Hard on
toes - and floors!
Drain as much of the oil out as possible. You might want to try running
it
through a paint strainer if you have the time, to clean it for re-use.
Like I said
before, I prefer to just use new oil, but trying that might be worth the
trouble.
I like to disassemble everything and drop the whole works into my parts
washer,
but you can just wipe it out, too. Not critical.
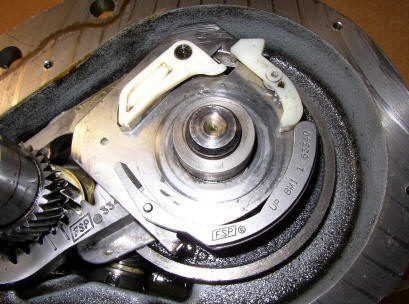
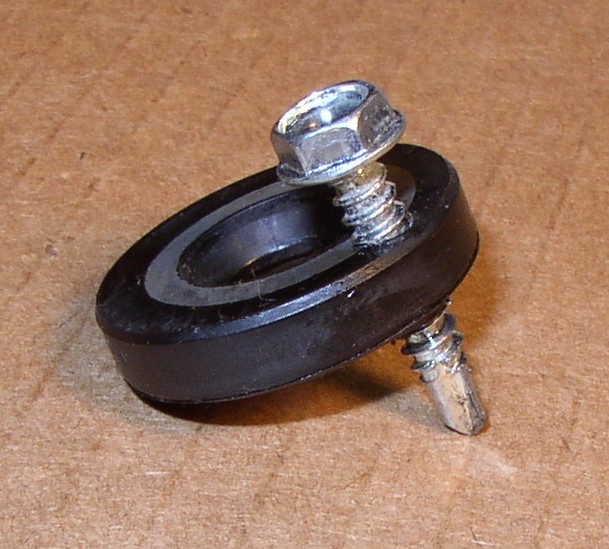
With the plastic spin gear out, follow directions in
the kit to replace the neutral
drain assembly. Its mounting plate is held to the main drive gear with a
single
5/32'' Allen screw that also serves as the spin pawl pivot. The trip
lever (smaller
white part on the right) spring was broken in the above gearcase, but
the spin
pawl (larger white part on the left) also can wear its end off.
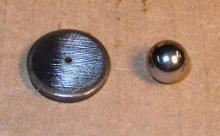
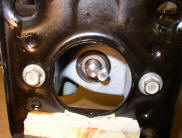
If you remove the shaft/rack assy from the gearcase
casting, be careful not to
lose the thrust ball and slug at the bottom end of the agitate shaft.
These two
parts 'hide' in the lower shaft bearing, down inside the casting and are
easy to
overlook. The ball goes in first, then the steel slug drops in on top of it.

If you pull the assy out, note the rack and pinion
alignment marks when
reassembling. A single slash mark on the agitate gear must align between
the
two on the rack gear teeth.
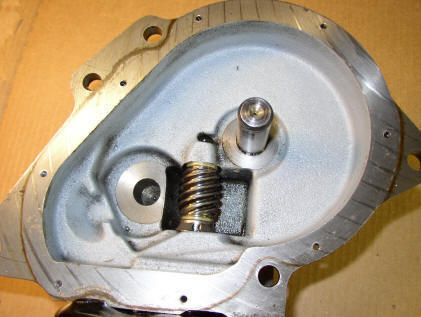
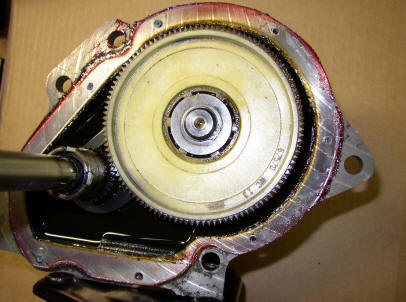
The gearcase casting, cleaned and ready for
reassembly
That's essentially it. If replacing the input shaft
seal, just run a sheet metal or
self-drilling screw into its edge at 2:00 or 7:00 to remove it, and
press the new one
in with a 3/4'' socket. Hammer a new coupler onto the input shaft with a
socket
extension, fill with 15 ounces of oil, seal the cover on, and reinstall
in the washer.
I plan on making this article available as an easily downloadable pdf
file soon,
and will let you know when that's ready to go.
***
Hey, swing by and check out my new Appliance Terms
Glossary Project if you haven't yet:
Glossary
Thanks again for allowing me into your inbox! I don't
take the privilege lightly.
'Sorry this issue got a bit long. It's hard to condense a procedure like
this into
few words.
May God richly bless you and yours in 2008,
Dave Harnish
Dave's Repair Service
New Albany, PA
drs@sosbbs.com
www.DavesRepair.com
Coming Soon to a planet near You: A real, lasting New
'Year'! ALL things new!
- Revelation 21
Copyright
www.DavesRepair.com All Rights Reserved
This information may be reprinted and distributed freely, but
only in its entirety, including this message
|